Arduino door lock
This was a project I came up with when living in a large house in college with multiple other roommates. My room was a popular one to hang out or leave jackets, purses, etc. in, and while I didn’t want to leave it unlocked all the time, I didn’t want to have return to unlock it for anyone that needed something.
The lock itself
Being a Computer Engineering major, I had never written nor interacted with a web server outside of text responses and dead-basic PHP. Looking back, this code is laughable with all of the character and string parsing done. I did know at the time that it was ridiculously insecure, but this was not something I was worried about people ever caring enough to try to break in. Never did end up changing the password from testpass either…
The Arduino served as a simple web server sending text responses. There were two supported requests, both GETs. All parameters were included as querystring params since I didn’t know about POSTing and I’m still not even sure if the Arduino Ethernet library supports it. If only the username and password were included, the Arduino would send back its status: locked or unlocked. If there was an included toggle parameter, the lock would be turned opposite of its current position and it would send a success message back to the requester.
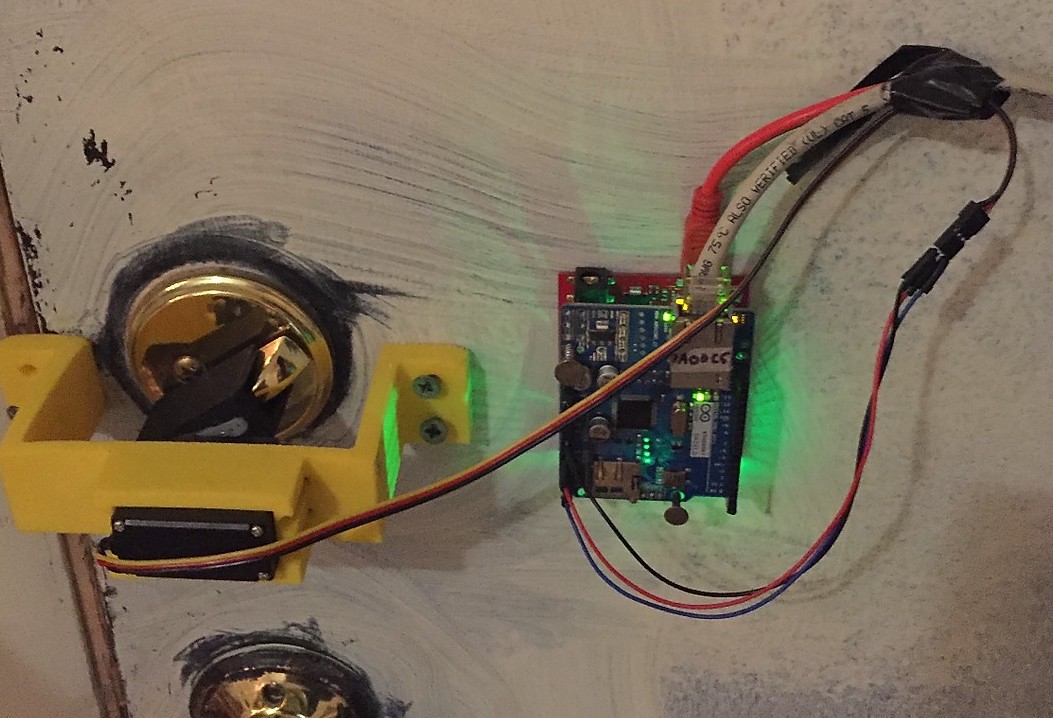
To actually unlock the door, the Arduino controlled a small servo. Attached to this servo was a small rectangular piece of plastic that I 3D printed to fit over the deadbolt while still allowing the servo knob to sit flush within an indentation on its backside.
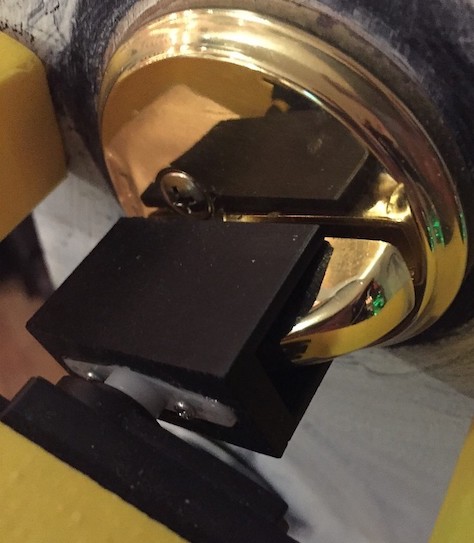
The servo arm is seated within a matching indentation on the backside while the flat arms of the piece border the deadbolt
To position the servo head-on with the deadbolt to match it’s turning plane, I needed a separate mount. I also modeled and 3D printed this after taking some rough measurements of the deadbolt width, thickness, and height off its baseplate.
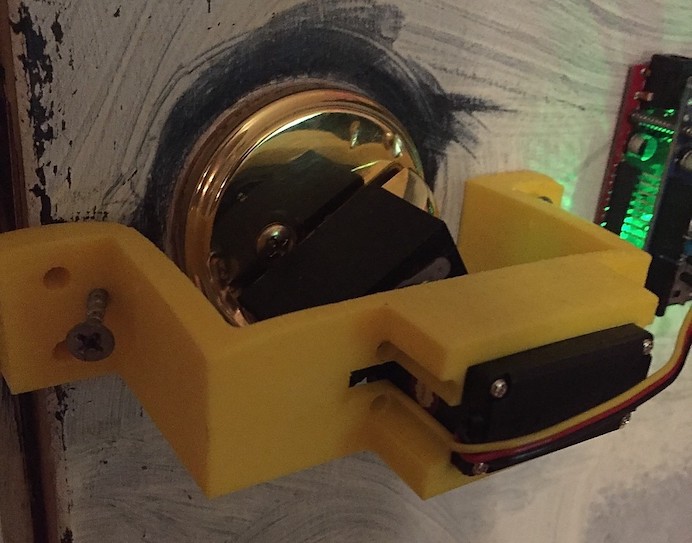
The servo wires needed space to exit its body, hence the gap on the side where it could slide in. There was minor warping with the part as it cooled but it was minor enough that it could still be used.
I decided where I wanted to mount the Arduino on the door, and then used guess-and-check for what the starting and ending values were to use for the servo. I used the simple Arduino servo library that allows you to basically analogWrite a value to the servo between 0 and 255 to position it.
I realized pretty quickly that having to open my phone, wait for the app to connect, and then tap to unlock my door was quite annoying to deal with if I was standing in front of it. I added a cheap numberpad I bought off somewhere like SparkFun or Adafruit to fix this issue. Within its loop, the Arduino would use the existing Keypad library to pull in any key pressed, push that onto an array, and compare that array with the hardcoded secret. If it matched, it would unlock, bypassing the need for an internet connection.
The app
I had recently finished an internship doing Android and iOS development, so it was fairly simple for me to throw together a really basic app for hitting the Arduino server. On startup it checked to see if it was on the local network that the Arduino was connected to or an external network, whether that be wifi or cellular. It set its request URL based on the network it found (why? See #2 below) and sent a status check to the determined URL. Once it received the response, it updated the screen to show the current status, and had a small Refresh button that would repeat the process. Tapping a large lock logo would send the toggle command to the Arduino followed by a second status request to make sure everything switched correctly. That’s it. Like I said, really basic.
The stuff that was annoyingly difficult to deal with
- A crash course in port forwarding and network bridges
Because the house was so large, we had the main modem upstairs connected to a main network switch that led to all of the ethernet ports throughout the place. Since I only had an ethernet shield for the Arduino at the time, this was great news…except for the fact that my port was on the opposite end of my room, and I didn’t have any cables long enough to reach. So did this mean that I spent ~$10 for a longer ethernet cable and fixed my problem in 1 hour? Of course not, I was a broke (and dumb) college kid! $10 was way too expensive.
After some searching, I realized I could bridge a router into the wifi network and pass that connection through its ethernet ports. I flashed an old Linksys-WRT router with DD-WRT firmware which enabled me to set it to client bridge mode, and after about 20 tries and reflashes finally got it configured correctly. At this point, I verified the Arduino was connected to the network correctly by logging into the main modem’s status page and verifying the Arduino local IP appeared.
The white Ethernet cable that heads out of the top of the frame connected to the Ethernet shield on the Arduino mounted on the door
I still needed to solve the issue of how to access the Arduino through the two layers of routers it lay behind (the first router being the external-facing one, the second the bridged one in my room). This is when I discovered the magic of how port-forwarding works for directing requests to different elements behind a single IP. First, I forwarded an arbitrary port within the external-facing modem to the IP of the network bridge router, and then from that router I forwarded the same port to 80 on the Arduino. By hitting the external, Comcast-assigned IP with a specific port, I could then reach the Arduino itself.
Theoretically yes, that IP could change at any time on Comcast’s whim. I set up a static DDNS domain to point to it so I could dynamically resolve it through that service rather than dealing with a hardcoded value in my app, but it really didn’t matter that much. The IP changed a grand total of zero times over 2 years.
- Loopback and external IPs
Once I got the server running locally, everything tested great from within the house. After finishing the pain (see #1 above) of all of the networking in order to access it externally, all the testing from outside the local network worked great. After getting back to the house however, nothing would connect to the Arduino. After a frustrating hour debugging, I realized that requesting the external static IP from within the network wouldn’t work. This is due to something called NAT loopback, where routers refuse internal connections requesting from an external address (aka looping back). All I had to do to fix it within the app was to check what the SSID of the network I was connected to. If it was something other than my local network, or nothing at all when using cellular, I used the external IP to toggle the lock. If I was on the local network, I could simply use the local IP of the network bridge and skip the first step of port forwarding.